My big guy has decided that he LOOOVEs "Oitmeal" Kinda like Ointment but with 'meal' at the end....
BUT he only loves the Banana Cream version which comes 2 in a box of 12 others. I WILL not buy hundreds of boxes of variety and have him eat 2.
SO I searched for a recipe...none. Lots of brown sugar, lots of cinnamon but no banana....
My take on the Banana Oatmeal...
Recipe:
5 cups Quaker Minute Oats
1/3 cup of Dry Milk
2/3 cups of Brown Sugar
2 T of Banana Instant pudding mix (DRY)
1 cup of freeze dried bananas
First pulse 4 cups of the Oats to a finer consistency.
Add 4 pulsed cups of Oats to a container and add in the final cup of Oats as is.
Add the Milk, Brown Sugar and pudding mix.
Pulse the Bananas to smaller pieces. Size depends on the kid.
Add all together and mix.
When it is time to cook add 1/2 cup of mix to a bowl and add water. My kids like it chunky so I added about a 1/3 cup of water.
Stir.
Eat and enjoy banana oatmeal without having to waste 10 packets!
Yay!

My foray into the crafting/blogging world. I work full time so I sneak my crafting in when the boys are asleep and/or occupied or when all else fails I invite them to join me in my fun.
Tuesday, November 27, 2012

Friday, May 18, 2012
Farm Birthday Party
For my littlest Troublemakers birthday we had a Farm theme party. This guy loves animals. He sleeps with 2 plastic ones (a giraffe and zebra) so it seemed fitting. His favorite song was Old MacDonald. So Old McJoseph had a farm!
We had lots of goodies!
 |
| Dog and Pig Nose chocolate |
 |
| Chicken Cake Pops |
 |
| Pudding and Oreo dirt with a gummy worm |
 |
| Rabbit food |
 |
| Haystacks |
Sunday, May 13, 2012
Birthday Shirt
My Munchkin (or littlest Troublemaker) turned 2 this year and we did a Farm themed party. I try to have a special T shirt for them ON their birthday so to go with the theme I used my Silhouette and Heat Transfer Vinyl to make a sheep :)
 It quite a few chuckles at school. He just loved picking at the eyeballs!


Wednesday, May 9, 2012
Guest Bathroom
I have been slowly personalizing my house (we moved in almost 2 years ago). The whole house was the same exact beige flat paint. The color was nice and neutral but it was ALL flat. Bathrooms are flat paint. Kitchen is flat paint. Pantry is flat paint. Hallways are flat paint. Bedrooms...yup you guessed it...flat paint. So my first task was the tackle the places with the most traffic and the most dirt. The boys bathroom was first. Next was the guest bathroom. It was the boring beige and in a room with no windows or natural light it was just dingy! I saw an idea for stripes and thought it looked divine! My idea was to make it into a beachy paradise. Brighten it up a bit.
 |
| My beige bathroom |


So as with all projects I started with paint. I painted the entire bathroom a bright white. That alone made SUCH a difference. Next up stipes.
 |
| See, much better.... |
I fell in love with a bright aqua. With the help of my very patient geek we marked lines and taped using a laser level. Three stripes later and I LOVED it.

I know I know, you are thinking, "Hey, I thought she said this room had no windows?!?" And you'd be correct! BUT, I said to myself, "Self, that is no excuse!" A quick Amazon search and I found this great window to the beach. A lil glue and some patience (again with my Geek's help) we had our very own beach view. My plan is to put up a valance and curtains to frame the window and give it a bit more Oomph.
Just a lil taste of the room....

Wednesday, May 2, 2012
Candy Molds How I love thee

She is a Red Hot Chilli Pepper fan and her recent 30th party was RHCP themed. I knew I could make something...and it turns out we made a few things...I will post them here....
First I printed out a basic RHCP symbol on computer paper.
I put a piece of wax paper on top and then using red melts in a squeeze bottle I drew the symbols. I just made a billion of them.
I let them dry and then they just peeled off the wax paper.
Next step, I got my blank candy mold. I tried this a few ways and found that filling the candy mold with the white chocolate and then carefully placing the shape on the Back worked the best. The red chocolate would melt a bit and blend in with the white and it left a perfect shape. Let that dry and then we had perfect RHCP candy.
Monday, April 30, 2012
Wreaths
My bestest friend is a 4th grade teacher and I made it my mission this year to make her the COOLEST teacher in the school. I have created wreaths for her door for a handful of the big holidays.....
The Back to School Wreath (contents: crayons, sharpener, rulers, erasers, fake flowers)

The Halloween Wreath (contents: lots and lots of google eyes, and a sign)
(Ack, tracking missing picture.....)
The Thanksgiving Wreath (contents: lots and lots of tulle, and a sign)

The Valentine Wreath (contents: old red T Shirt, Felt hearts, heart ribbon)

The Spring Wreath (contents: old jeans, felt flowers, felt banner, twine, ladybug ribbon)

Next year I plan to create:
* a Winter one (ran out of time this year but I had the stuff to make a white yarn pom pom snowman on a cute snowflake fabric)
* a USA one
* St Patty's Day one
The Back to School Wreath (contents: crayons, sharpener, rulers, erasers, fake flowers)

The Halloween Wreath (contents: lots and lots of google eyes, and a sign)
(Ack, tracking missing picture.....)
The Thanksgiving Wreath (contents: lots and lots of tulle, and a sign)

The Valentine Wreath (contents: old red T Shirt, Felt hearts, heart ribbon)

The Spring Wreath (contents: old jeans, felt flowers, felt banner, twine, ladybug ribbon)

Next year I plan to create:
* a Winter one (ran out of time this year but I had the stuff to make a white yarn pom pom snowman on a cute snowflake fabric)
* a USA one
* St Patty's Day one
Friday, April 27, 2012
Ewoks
So, I had my very first order for Cake Pops. A friend asked if I could make Ewoks for her 5 yo son's birthday party. I was up to the challenge...I looked for images and found one that looked doable. But it has no instructions. I used it as a starting point and went from there...
I used a basic Chocolate cake mix and a Funfetti cake mix and used my handy dandy Cake Pop maker. I LOVE this thing.
Once they were made - I froze them. After a day in the freezer I stuck them with a lollipop stick and put them back in the freezer for an hour or so.
Next comes the fun part!
I got some Candy Corns and cut the tips off. Using a lil melted chcolate and attached them to the top of the head and let those dry.


These could be great base shapes for anything with ears (cats, bears..the list is endless)
By this time it was approaching 10pm so the pictures get a lil sparse...
I dipped the back of the head in a darker chocolate and then using a toothpick drew it around the head in the shape of a hoodie. Then with the dark brown I put a dot for eyes and a slash for a nose.


I hear the lil guy loved it!
Thursday, April 19, 2012
Goodies
I have been away and have found a new love. CAKE POPS and Chocolate Lollipops. Oh FUN!
I have made pots of gold for St Patty's day, bunnies for Easter and now Ewoks for a lil boy's birthday party. Oh they are addicting...
So let's start with the Pots of gold. I am thinking they can be turned into lots of things (seeing as I am sharing this late....)
1. First follow the standard Cake Pop Rules (roll or bake, stick and dip) BUT for this one don't shake off the extra chocolate. Turn it upside down on a sheet of wax paper. This will make it pool at the bottom and make the rim of the pot.

2. Once they set, pick up your perfectly shaped pot!

3. Now with a little bit of melted chocolate make a circle on the top of the pot, I used a little baby spoon to scoop it out and smear it on.
 4. Sprinkle your gold sprinkles or sugar and you have a Pot of Gold
 (you can see the many other colors I created in the background...I was aiming at all the colors of the rainbow)
The final product...
 Next up Bunnies....
I have made pots of gold for St Patty's day, bunnies for Easter and now Ewoks for a lil boy's birthday party. Oh they are addicting...
So let's start with the Pots of gold. I am thinking they can be turned into lots of things (seeing as I am sharing this late....)
1. First follow the standard Cake Pop Rules (roll or bake, stick and dip) BUT for this one don't shake off the extra chocolate. Turn it upside down on a sheet of wax paper. This will make it pool at the bottom and make the rim of the pot.

2. Once they set, pick up your perfectly shaped pot!

3. Now with a little bit of melted chocolate make a circle on the top of the pot, I used a little baby spoon to scoop it out and smear it on.


The final product...

Monday, April 16, 2012
Bunnies take 2
So last Easter I made Bunny Truffles...you can tell it was my first attempt at candy coating...so blotchy...almost like the lil guys had some disease!
So take two was a little different but my year of experience paid off!
I made three different versions...

The first: Bunny nose mold for the Teachers.
Don't have step by step pictures for this...just melted pink melts, white melts and then combined some brown and white. Piped in some pink for the nose, let that dry.
Piped in some brown for the forehead, let that dry
Dumped white over them all and put a stick in it!

The second: The Oreo Bunny
I had a box of White Chocolate Oreos calling out to me...so I made them for my Munchkins Spring Party.
First, cut ears out of Marshmallow stackers
Melt pink candy to attach the jelly bean nose
Melt white candy to attach mini chips for eyes
Melt white chocolate candy to attach the ears
Draw ear centers with Red Food Coloring (wish that it was not so RED)
and Tada!

The third: The Bunny Lollipop
I had an aha moment that the White Fudge covered Oreos given to me by my SIL would be perfect! But I only had 3. After searching 3 stores and coming up empty I knew I could have to have a second item for Lil Man's class. In a moment of pure genius I remembered the blank lollipop mold I bought for my Sisters party (more on that later). I could make a bunny out of that!!
First step, pour white chocolate into mold and stick it.
Once set pull out.
Melt pink candy to attach jelly bean nose.
Melt white candy to attach mini chips for eyes
Then I was stumped...ears...The marshmallows would not work...too big..
The great Bakerella used Pipe Cleaners for ears...but I did not have white.
Then another aha....I needed to bag them, why not make those into ears. So poke the stick through the bottom of the bag and gather the bag around the bunny. Using the pipe cleaners wrap it around the top.
Cut down the middle of the excess to minic ears and use the pipe cleaners to separate it.
A bunny was born!

So take two was a little different but my year of experience paid off!
I made three different versions...

The first: Bunny nose mold for the Teachers.
Don't have step by step pictures for this...just melted pink melts, white melts and then combined some brown and white. Piped in some pink for the nose, let that dry.
Piped in some brown for the forehead, let that dry
Dumped white over them all and put a stick in it!

The second: The Oreo Bunny
I had a box of White Chocolate Oreos calling out to me...so I made them for my Munchkins Spring Party.
First, cut ears out of Marshmallow stackers
Melt pink candy to attach the jelly bean nose
Melt white candy to attach mini chips for eyes
Melt white chocolate candy to attach the ears
Draw ear centers with Red Food Coloring (wish that it was not so RED)
and Tada!

The third: The Bunny Lollipop
I had an aha moment that the White Fudge covered Oreos given to me by my SIL would be perfect! But I only had 3. After searching 3 stores and coming up empty I knew I could have to have a second item for Lil Man's class. In a moment of pure genius I remembered the blank lollipop mold I bought for my Sisters party (more on that later). I could make a bunny out of that!!
First step, pour white chocolate into mold and stick it.
Once set pull out.
Melt pink candy to attach jelly bean nose.
Melt white candy to attach mini chips for eyes
Then I was stumped...ears...The marshmallows would not work...too big..
The great Bakerella used Pipe Cleaners for ears...but I did not have white.
Then another aha....I needed to bag them, why not make those into ears. So poke the stick through the bottom of the bag and gather the bag around the bunny. Using the pipe cleaners wrap it around the top.
Cut down the middle of the excess to minic ears and use the pipe cleaners to separate it.
A bunny was born!

Friday, April 13, 2012
Thanksgiving Table
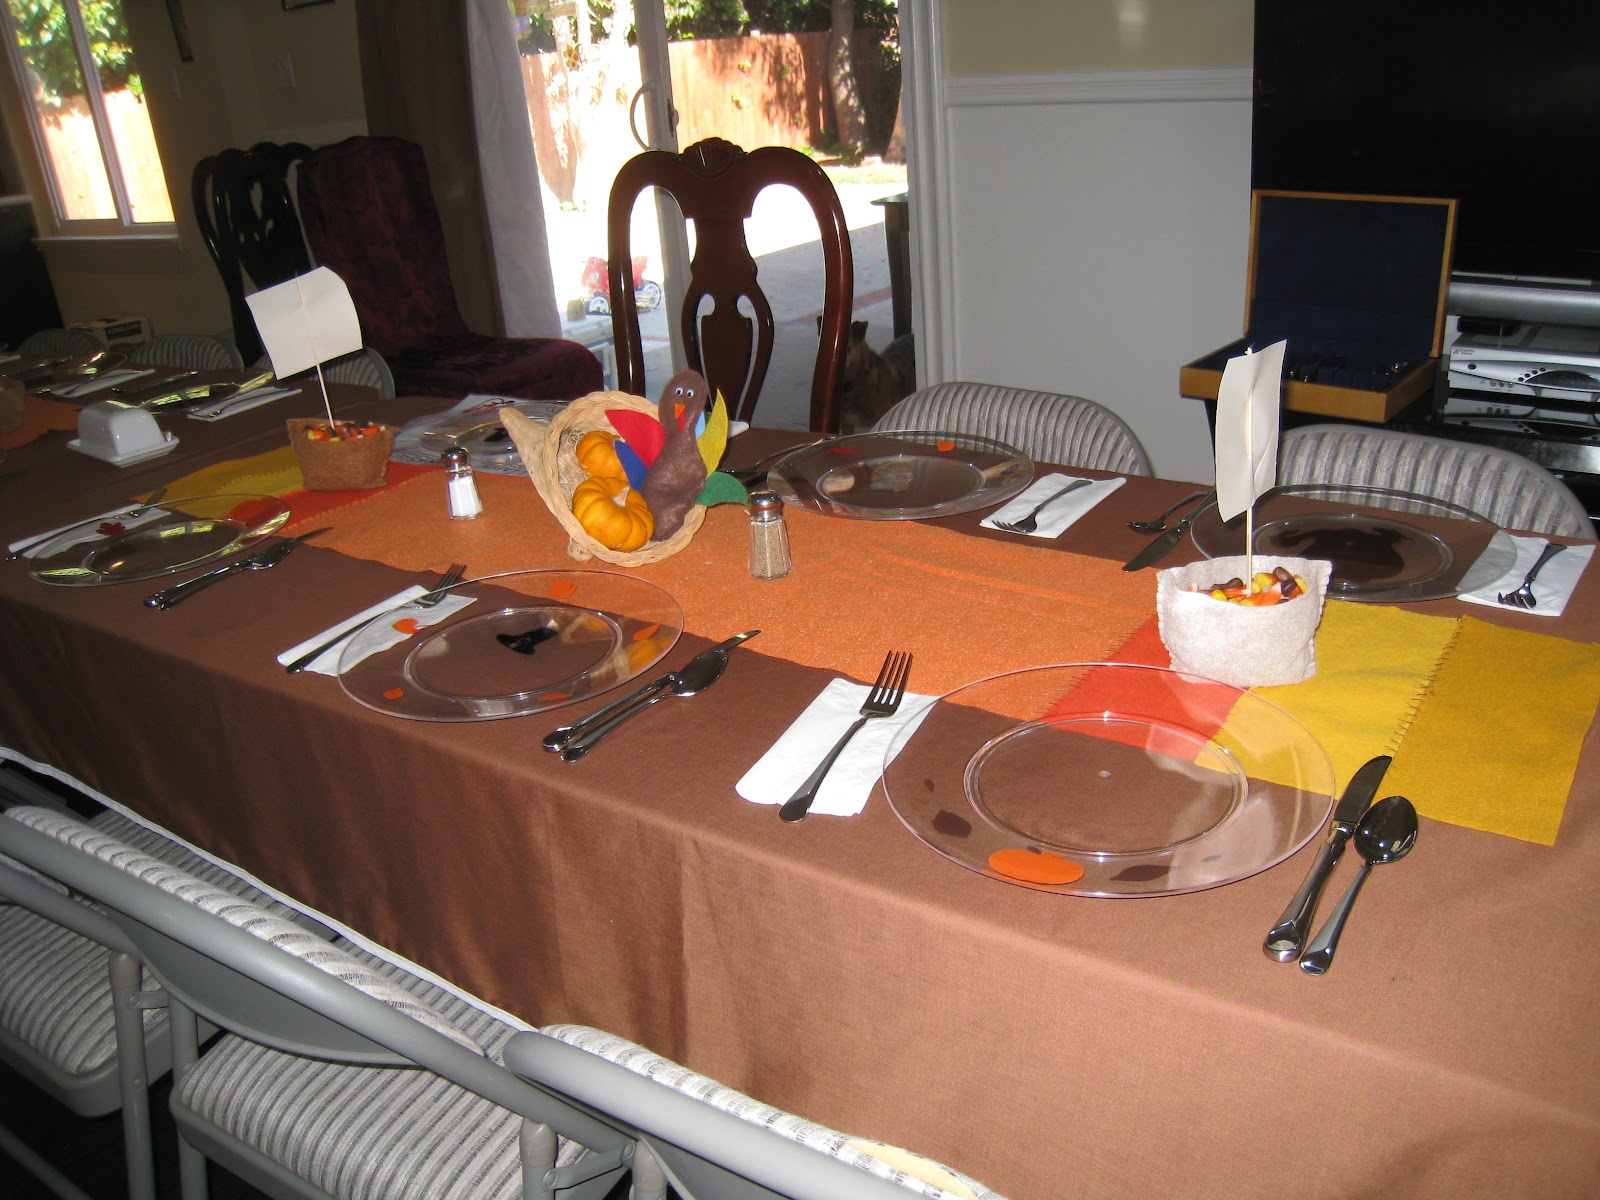
It was the first time I was hosting the whole family at my house for Thanksgiving so I went a little overboard...
I wanted to share my table setting for posterity :)
I used my Cricut to cut cute Thanksgiving themed vinyl shapes and adhered them to the bottom of my acrylic plates for a little fun.

I cut felt boats and filled them with Candy Corn for the center of the table.

I created a Tossing Turkey for my 4 year old's share toy at school so it sat in the center of the table with a cornucopia of pumpkins.

And just for a splash of color I had a orange and yellow felt runner down the center of the table.

Super simple but makes a great statement!
See you Next Holiday :)
I wanted to share my table setting for posterity :)
I used my Cricut to cut cute Thanksgiving themed vinyl shapes and adhered them to the bottom of my acrylic plates for a little fun.

I cut felt boats and filled them with Candy Corn for the center of the table.

I created a Tossing Turkey for my 4 year old's share toy at school so it sat in the center of the table with a cornucopia of pumpkins.
And just for a splash of color I had a orange and yellow felt runner down the center of the table.

Super simple but makes a great statement!
See you Next Holiday :)
Thursday, January 5, 2012
Pictures
I have tried and tried to upload pictures to my posts but it is being denied...so the dilemma... do I post without pictures or just stop this all together....I am pretty much talking to myself! :)
Thursday, October 27, 2011
Birthday Blocks
My niece turned one and her mom and I made a bunch of blocks for her both to serve as decorations for the party and her room but also for her to play with. Of course we went with a Diva theme, I mean, how could you not with a DOB of 90210 (Sept 2, 2010)


They started out with my favorite blocks from TJ Maxx....seen before on this blog:
Next up add, fun paper, sparkle mod podge and vinyl.... VOILA!

The spell out her name, her special day 90210, Hottie, Glamour, and a bunch of girlie images.
Tuesday, October 25, 2011
Little Man's Birthday
My Little Man turned FOUR! I know not a big deal..but since when did I become the parent of a 4 year old.
His party was Fireman Themed.
We had invitations created by my talented roomie. Favors were the fireman and police hats from the Dollar Bin at Target...and the best part....the homemade carnival game created by the hubs and me!

Paint
Clear spray sealant
2x4s
So first up, get your adorable hubby to cut out the cityscape outline.
Second figure out the placement of the windows and draw the general window form and the flame.
Beg and plead hubs to cut the shape of the flame and the outline of the window.
Spray flames with sealant
Attach flames to open window with hinges.
Have Hubs and FIL rig up a stand using 2x4s.
Day of party, con niece, nephew and roommate to fill up 400+ water balloons.

A HUGE hit!
His party was Fireman Themed.
We had invitations created by my talented roomie. Favors were the fireman and police hats from the Dollar Bin at Target...and the best part....the homemade carnival game created by the hubs and me!

Supplies:
HUGE piece of plywood
HingesPaint
Clear spray sealant
2x4s
So first up, get your adorable hubby to cut out the cityscape outline.
Second figure out the placement of the windows and draw the general window form and the flame.
Beg and plead hubs to cut the shape of the flame and the outline of the window.
Have 4 yr old help you paint the flames red, orange and yellow.
Paint the cityscape with gray spray primer, gray paint and then realize it does not cover enough and go back to hardware store for glossy can paint and do it all over again....Spray flames with sealant
Attach flames to open window with hinges.
Have Hubs and FIL rig up a stand using 2x4s.
Day of party, con niece, nephew and roommate to fill up 400+ water balloons.
The moment of truth, let 15+ 4 year old Firemen throw water balloons at the "burning building to put out the fire"

 |
| Birthday Boy taking his turn |
Tuesday, June 28, 2011
Teacher Gifts - Valentine's Day
A little late, but can certainly be adapted for end of year gifts, birthdays or appreciation days.
_______________________________________________________
So for my wonderful teachers this year I thought I would try to make somthing. So many great ideas out in blog land.
I decided on some chalkboard frames and some heart chalk.


Supplies:
Frame
Chalkboard paint
Chalk Hearts
Ribbon
First paint your frames with chalkboard paint. I used the spray kind. I put 3 coats to make sure it was good and covered. Following the directions on the can let it sit and then cure it.
Next up, make chalk hearts following this great tutorial or get lucky and find a 3 pack of heart chalk at Michael's for a whopping $0.49! that is $0.17 a heart! Go me :)
Then decorate the frame. I went with hearts to go with the theme. Write a cute message in chalk.
Last wrap your frame and chalk with pretty ribbon and Voila you are done!
Monday, June 27, 2011
Summer Love
Kitchen Aid Mixer, how I love thee!!
I bought my stand mixer about a year ago when we bought our house. It was my present to myself. Now, I have made many baked confections much to the dismay of my and my husband's waist line.
So it was time to branch out...
Duh Duh Duhhhhh.....Enter the Ice Cream Maker Attachment. Purchased at Amazon
![]() OH MY GOD, it was delicious. Like never going to buy ice cream delicious!
OH MY GOD, it was delicious. Like never going to buy ice cream delicious!
I have some leftover vanilla beans from my homemade Vanilla extract and went to town!
1 pint of Heavy Cream
1 cup of Half and Half
3/4 cup of Sugar
Pinch of Salt
1 Vanilla Bean, split lengthwise
3/4 tsp of Vanilla Extract (used my homemade version)
Pour 1 cup of Cream in pan and add the sugar and salt. Scrape the seeds from the vanilla bean and add the pod to the pot. Warm over medium heat, stirring until the sugar is dissolved.
(Side note about the Vanilla Beans...they are sticky and tended to clump. I found that if I smeared them a bit they did not end up in large clumps...my hands smelled like vanilla for a day but there are worse things!)
Remove from heat and add the remaining cup of Cream and the cup of Half and Half.
Add the Vanilla extract.
Put the batter in a air tight container and in the fridge.
Next Day, add batter to your frozen bowl according to directions. I ended up mixing for about 40 min. (The book says 20-30).
Throw it into a flat tupperware and put in freezer for a few hours.
Dish it out and top with fresh berries....OMG it was inhaled by all.
Next up, Lemon Sorbet!
I bought my stand mixer about a year ago when we bought our house. It was my present to myself. Now, I have made many baked confections much to the dismay of my and my husband's waist line.
So it was time to branch out...
Duh Duh Duhhhhh.....Enter the Ice Cream Maker Attachment. Purchased at Amazon

I have some leftover vanilla beans from my homemade Vanilla extract and went to town!
1 pint of Heavy Cream
1 cup of Half and Half
3/4 cup of Sugar
Pinch of Salt
1 Vanilla Bean, split lengthwise
3/4 tsp of Vanilla Extract (used my homemade version)
Pour 1 cup of Cream in pan and add the sugar and salt. Scrape the seeds from the vanilla bean and add the pod to the pot. Warm over medium heat, stirring until the sugar is dissolved.
(Side note about the Vanilla Beans...they are sticky and tended to clump. I found that if I smeared them a bit they did not end up in large clumps...my hands smelled like vanilla for a day but there are worse things!)
Remove from heat and add the remaining cup of Cream and the cup of Half and Half.
Add the Vanilla extract.
Put the batter in a air tight container and in the fridge.
Next Day, add batter to your frozen bowl according to directions. I ended up mixing for about 40 min. (The book says 20-30).
Throw it into a flat tupperware and put in freezer for a few hours.
Dish it out and top with fresh berries....OMG it was inhaled by all.
Next up, Lemon Sorbet!
Friday, May 20, 2011
New Sign
My first Upcycle Craft.
 I like it!
So, I started with this that I purchased at a Goodwill store for a whopping 3 bucks. I liked the gold trim and the fact that it was a thick sign
 First step, I put a layer of brown acrylic paint to cover the base
 Next I streaked black and white acrylic paint. to add some dimesions...
 I wanted it to look sorta like wood? Dunno, It worked.
Finally I cut my saying using SCAL. and Gold Vinyl.
Voila! It now hangs over my hall closet.


So, I started with this that I purchased at a Goodwill store for a whopping 3 bucks. I liked the gold trim and the fact that it was a thick sign


Finally I cut my saying using SCAL. and Gold Vinyl.
Voila! It now hangs over my hall closet.

Thursday, May 19, 2011
Endless Craft Possibilities
We just bought a miter saw so the possibilities have just quadrupled in my house! I can't wait to put it to good use.
A few projects I'd like to try:
Signs (name plaques, wall decorations)
Blocks and Bases for the blocks
Shelves in our linen closet
Marshmallow Guns as seen here
Memory Game
This is just off the top of my head...I know if I sit and think I will come up with oodles more!
A few projects I'd like to try:
Signs (name plaques, wall decorations)
Blocks and Bases for the blocks
Shelves in our linen closet
Marshmallow Guns as seen here
Memory Game
This is just off the top of my head...I know if I sit and think I will come up with oodles more!
Monday, May 9, 2011
Cookies
I love to Bake. When I was pregnant with Munchkin it was the only nesting activity I could do. We had NO space for him (he slept in the pack and play in our already cramped room) so I turned to baking. I have found quite a few recipes that I love. One is a Toffee Cookie that has become a favorite.
I have made it a few different ways and I thought I'd share them with you!
Basic Toffee Cookie
2.5 cups of flour
1 tsp salt
1 tsp baking soda
1 cup unsalted butter (softened) **
1.5 cups of sugar
2 eggs
1 tsp vanilla
1.5 cups chopped Skor bars (8 1.4 oz bars)
** I have substitued 1/2 cup of applesauce for the butter and it was great!
1. Sift together flour, salt and baking soda. Set aside
2. Cream butter until fluffy. Add sugar and continue to beat until light and fluffy. (I usually go get the eggs and come back while it is mixing) Beat in eggs one at a time, add vanilla.
3. Add 1/3 flour mix, 1/3 skor bars, and so on until all is mixed in. Chill cookie dough for at least 1 hour.
4. Preheat oven to 350F. Line cookie sheets with parchment paper ( NOT Wax paper, learned that the hard way) or Silpat. Scoop out cookie dough in small drops (about 1 inch). Make sure they are about 3 inches apart they spread like crazy!
5. Bake for 8-12 min depending on the method used (I will explain later) Remove from oven and let cool for a few minutes. Move to a wire rack to cool. Package and make all your friends love you!
So now my many changes.
Silpat vs Parchment Paper: I found that parchment paper needs more time and Sil pat less. My first time using the Silpat I had mini toffe briquettes after 10 min.
Cookie Cake: I have baked it in a silicone 8x8 pan at 300F for about 30 min. I topped it with a choclate truffle sauce and then homemade whipped cream and it was divine!
Mini Mini Cakes: I have thrown them in mini muffin tins and baked them for 12- 15 min. They make lil cookie cups.
Mini Cakes: Just baked them in muffin tins (baked for 20 - 22 min) topped them with the same truffle sauce. Later when it was time to eat them, nuked them for about 10 seconds and topped with icecream it was so good!
I have made it a few different ways and I thought I'd share them with you!
Basic Toffee Cookie
2.5 cups of flour
1 tsp salt
1 tsp baking soda
1 cup unsalted butter (softened) **
1.5 cups of sugar
2 eggs
1 tsp vanilla
1.5 cups chopped Skor bars (8 1.4 oz bars)
** I have substitued 1/2 cup of applesauce for the butter and it was great!
1. Sift together flour, salt and baking soda. Set aside
2. Cream butter until fluffy. Add sugar and continue to beat until light and fluffy. (I usually go get the eggs and come back while it is mixing) Beat in eggs one at a time, add vanilla.
3. Add 1/3 flour mix, 1/3 skor bars, and so on until all is mixed in. Chill cookie dough for at least 1 hour.
4. Preheat oven to 350F. Line cookie sheets with parchment paper ( NOT Wax paper, learned that the hard way) or Silpat. Scoop out cookie dough in small drops (about 1 inch). Make sure they are about 3 inches apart they spread like crazy!
5. Bake for 8-12 min depending on the method used (I will explain later) Remove from oven and let cool for a few minutes. Move to a wire rack to cool. Package and make all your friends love you!
So now my many changes.
Silpat vs Parchment Paper: I found that parchment paper needs more time and Sil pat less. My first time using the Silpat I had mini toffe briquettes after 10 min.
Cookie Cake: I have baked it in a silicone 8x8 pan at 300F for about 30 min. I topped it with a choclate truffle sauce and then homemade whipped cream and it was divine!
Mini Mini Cakes: I have thrown them in mini muffin tins and baked them for 12- 15 min. They make lil cookie cups.
Mini Cakes: Just baked them in muffin tins (baked for 20 - 22 min) topped them with the same truffle sauce. Later when it was time to eat them, nuked them for about 10 seconds and topped with icecream it was so good!
Wednesday, May 4, 2011
Vinyl Love
OMG where have I been??? I purchased vinyl ages ago and was just plum scared to try it. It looks so complicated. I was unsure how to cut it in my Cricut. I was baffled by the transfer tape. I was just unsure about it but I LOVED all the stuff in the blog world.
So for Teacher Appreciation I decided to just do it (cue uplifting music).

I bought these basic (plain) acryllic tumblers at Marshall's for $4.
In addition I added colorful reusible ice cubes so that the Teachers can have cold drinks that don't get watered down.


Create my letters and shapes in Sure Cuts a Lot and CUT!
Next find vinyl in coordinating colors.
Attach mix and matched colors using contact paper and
Voila! Gorgeous cups ready for summer.
Subscribe to:
Posts (Atom)
